Unraid-Einstellungen anpassen
Das Unraid OS funktioniert automatisch, ermöglicht jedoch die weitere Anpassung von Einstellungen wie IP-Adresse, Hostname, Festplattenoptimierungen und mehr über die Registerkarte Einstellungen im Unraid WebGUI.
Tailscale ist ein optionales Plugin, das Sie über den Tab Apps durch Suchen nach "Tailscale" installieren können. Es bietet sicheren Fernzugriff auf Ihr Netzwerk und fügt Ihren Einstellungen einen Abschnitt Tailscale hinzu, um erweiterte Fernverwaltungsfunktionen zu bieten.
![]()
Nicht vergessen - die WebGUI enthält eingebaute Hilfe. Um Hilfe für ein bestimmtes Feld zu erhalten, klicken Sie auf das Symbol daneben oder verwenden Sie das Hilfe-Symbol ![]() oben rechts in der Benutzeroberfläche, um die Hilfe für alle Felder zu aktivieren.
oben rechts in der Benutzeroberfläche, um die Hilfe für alle Felder zu aktivieren.
Systemeinstellungen
Systemeinstellungen ermöglichen Ihnen die Konfiguration wichtiger Funktionen wie Netzwerk-, Freigabe-, VM- und Laufwerkseinstellungen.
CPU-Pinning
CPU Pinning allows you to assign specific CPU cores to VMs (Virtual Machines) or Docker containers. This is particularly important for performance-sensitive workloads, such as gaming VMs. Even if you manually assign Docker containers to avoid conflicts with your gaming VM, the host operating system may still utilize those cores for tasks like managing the WebGUI, running a parity check, or performing BTRFS operations.
- Wenn Sie einen Kern an eine VM oder einen Docker-Container heften, wird dieser Kern der VM oder dem Container zugewiesen. Das Unraid OS kann jedoch weiterhin darauf zugreifen, um Routineaufgaben auszuführen.
- Wenn Sie einen Kern isolieren, wird er ausschließlich der VM oder dem Container zugewiesen und steht dem Unraid OS nicht mehr zur Verfügung.
- Sie können Kerne ohne Neustart Ihres Servers zuweisen, aber das Anwenden von CPU-Isolationsänderungen erfordert einen Neustart des Systems.
Datum & Uhrzeit
Auf dieser Seite können Sie Ihre Zeitzone einstellen und die Verwendung von bis zu vier NTP-Servern umschalten. Sie sollten Unraid an Ihre Zeitzone anpassen, um eine genaue Zeitmessung zu gewährleisten.

Datenträgereinstellungen
You can modify additional settings for your disk devices on this page. Enable your array to start automatically on boot, adjust disk spin-down timers, and even change advanced driver settings like SMART polling frequency.


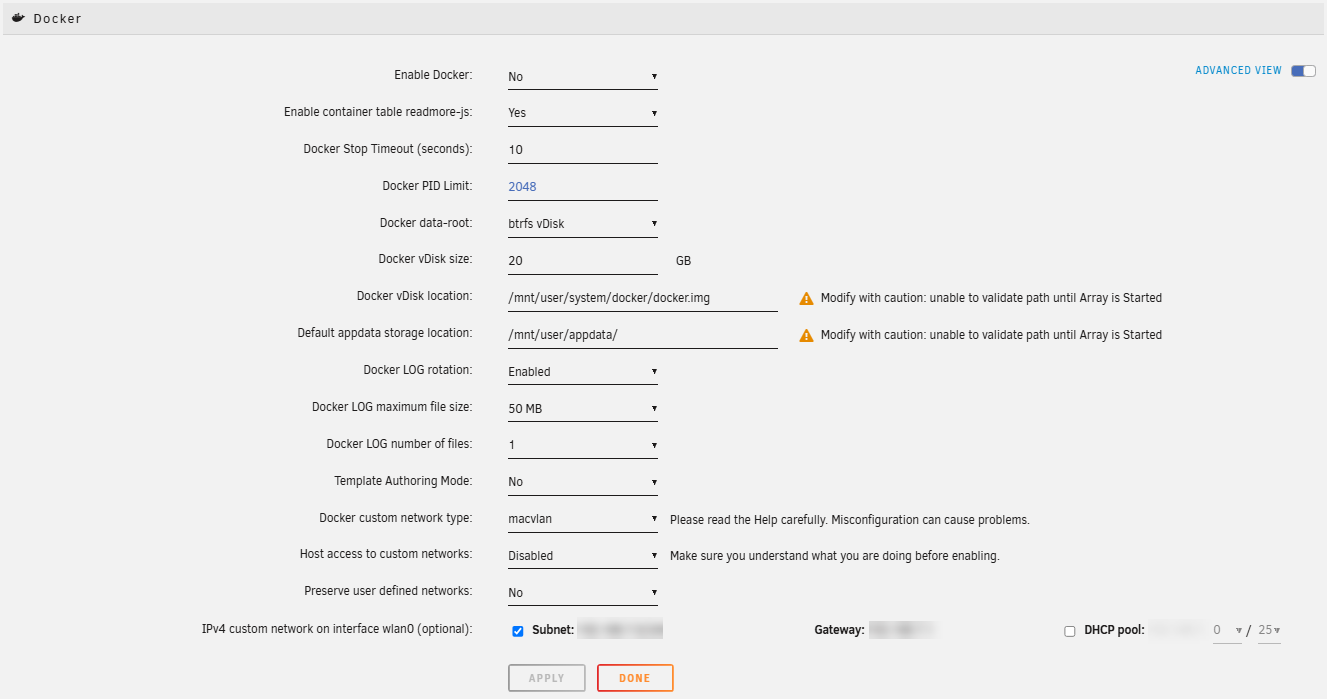
Docker
Docker-Container ermöglichen es Ihnen, vorkonfigurierte Linux-Anwendungen in Ihren Unraid-Server zu integrieren. Einzelheiten finden Sie auf der Seite Docker-Verwaltung.
Kennung
Unraid nutzt standardmäßig den Hostnamen tower, aber Sie können ihn hier ändern. Sie können auch eine Beschreibung oder Modellnummer für Ihr System hinzufügen.

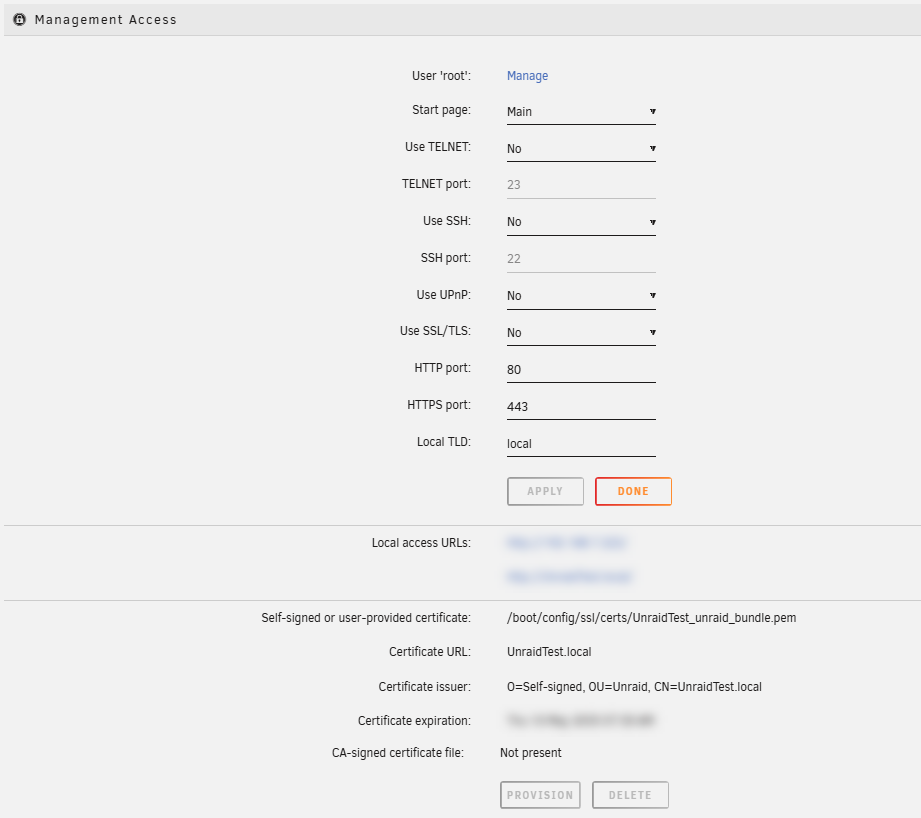
Verwaltungszugang
You can configure various access settings for your Unraid server, including enabling Telnet or SSH, setting ports for SSL/TLS, HTTP, and HTTPS, and defining the default landing page for Unraid. For detailed information about securing your WebGUI with SSL certificates, see Securing your connection.
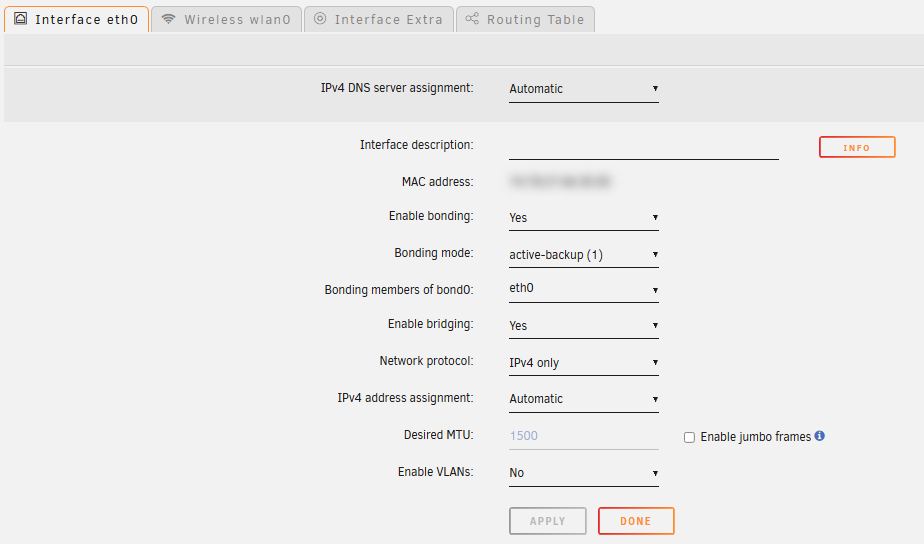
Netzwerkeinstellungen
By default, Unraid tries to obtain an IP address from a DHCP server on your local network, usually provided by your router. On this page, you can configure a static IP address, set up bonding, bridging, or explore other options. While setting a static IP is recommended, it is not necessary to use Unraid.
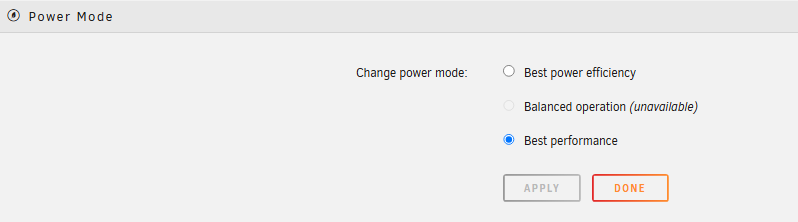
Leistungsmodus
Die Einstellung Power Mode ermöglicht es Ihnen, Ihren Unraid-Server für Energieeffizienz, ausgewogene Betriebsweise oder maximale Leistung zu optimieren. Sie können aus den verfügbaren Modi - Beste Energieeffizienz, Ausgewogener Betrieb oder Beste Leistung - wählen, um Ihren Arbeitslasten und Energiepräferenzen gerecht zu werden. Die Anpassung des Power Modes kann dazu beitragen, den Energieverbrauch zu senken, die Systemtemperaturen zu reduzieren oder zusätzliche Ressourcen für anspruchsvolle Aufgaben bereitzustellen.
Änderungen treten sofort in Kraft und erfordern keinen Neustart des Systems.
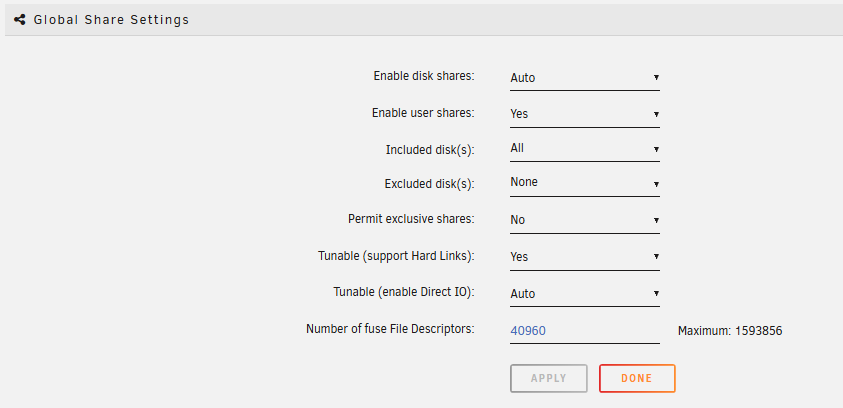
Globale Freigabeeinstellungen
User shares can greatly simplify the organization and access of content across multiple disks in the array. You have the option to specify which disks are allowed to participate in user shares through global inclusion or exclusion settings.
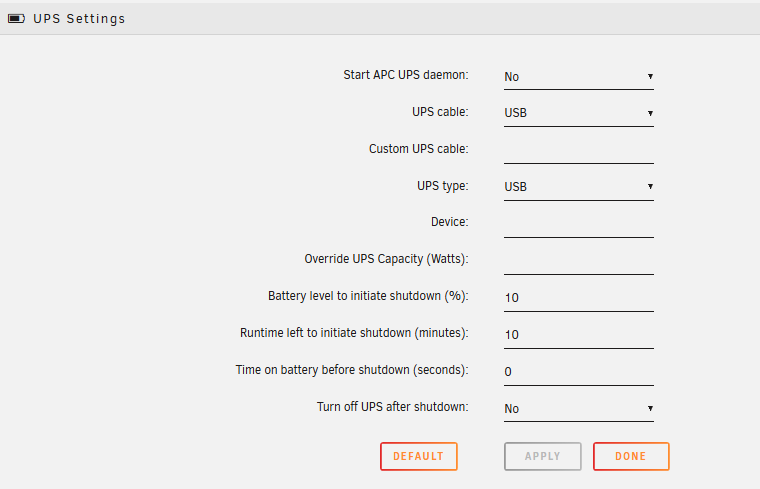
USV-Einstellungen
Unraid kann mit einer APC (oder kompatiblen) USV (Unterbrechungsfreie Stromversorgung) verbunden werden, um das System bei einem Stromausfall sicher herunterzufahren, während es weiterhin Batteriestrom erhält. Sie können die USV-Verbindung konfigurieren und Richtlinien für den Shutdown-Befehl auf dieser Seite festlegen.
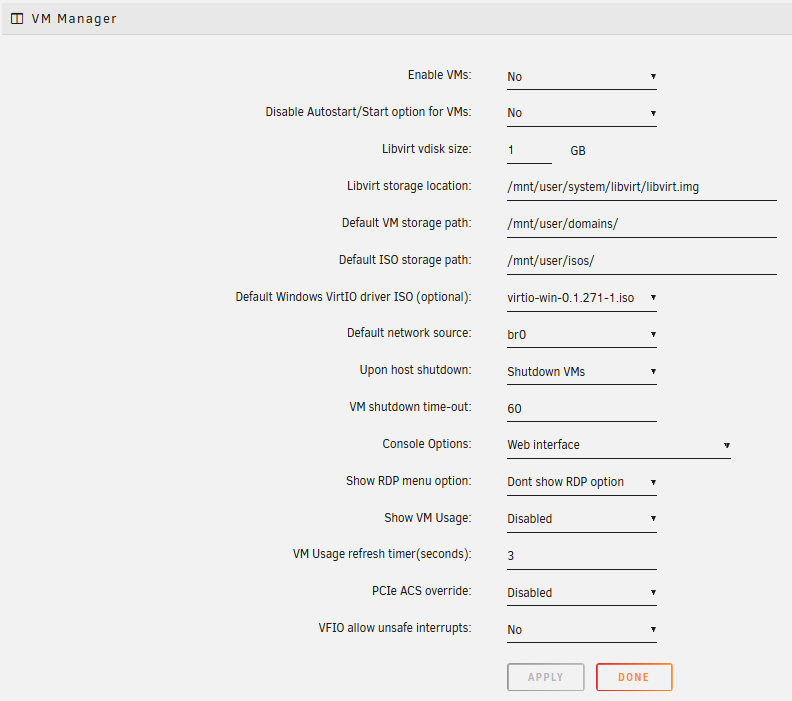
VM-Manager
Virtuelle Maschinen (VMs) können Ihren Server in einen Desktop oder Medienplayer verwandeln und Anwendungen ausführen, die nicht für Linux konzipiert sind. Weitere Informationen zum Verwalten von VMs auf Unraid finden Sie im Abschnitt VM-Einrichtung.
NFS (Network File System)
Network Services let you configure network communication protocols on your Unraid server, which are essential for user and disk shares. You can also enable an FTP server, a logging server, and set up a VPN for secure remote access.
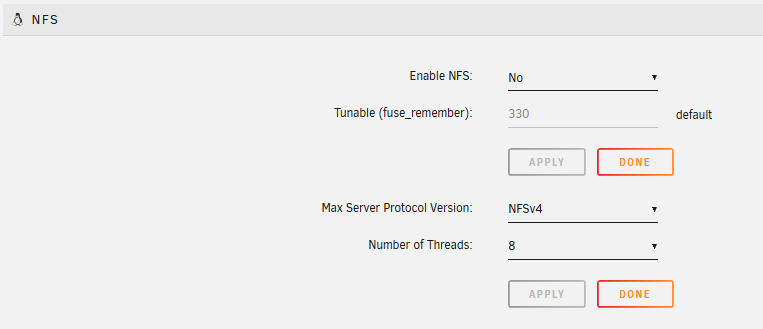
NFS (Network File System)
NFSv4 support is available in Unraid. You can enable or disable it for user shares and adjust the fuse_remember tunable to help resolve NFS Stale File Handle errors.
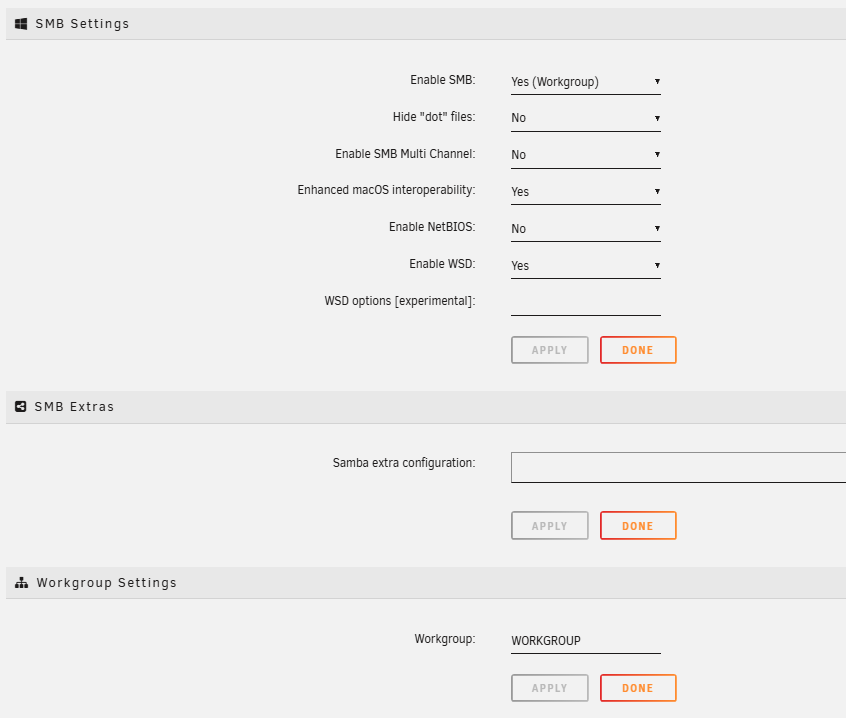
SMB (Server Message Block)
Das SMB-Protokoll wird von Microsoft Windows-Clients verwendet. Auf dieser Seite können Sie es aktivieren, eine Arbeitsgruppe definieren oder einer Active Directory-Domäne beitreten.
FTP (File Transfer Protocol)
Users can connect via FTP only if they are added to the FTP users field on this page. If no users are added, the FTP service will not start.

Syslog-Server
Der Syslog-Server speichert dauerhaft Ihr Systemlog, was für die Fehlerbehebung nützlich ist, da Unraid das Log nach jedem Neustart löscht.

Tailscale
Der Tailscale-Abschnitt ist nur verfügbar, wenn Sie das Tailscale-Plugin installiert haben.
Sie können eine VPN-Verbindung zu Ihrem Unraid-Server mithilfe von Wireguard für sichere Internetverbindungen herstellen.
Sie können Ihren Server auch als Subnetz-Router für lokale Geräte oder als Exit-Node konfigurieren, um Internetverkehr zu leiten. Dieser Abschnitt ermöglicht die Verwaltung beworbener Routen, den Status von Exit-Nodes, Integrationsoptionen für Docker-Container und die Überwachung des Verbindungsstatus zur Fehlersuche.

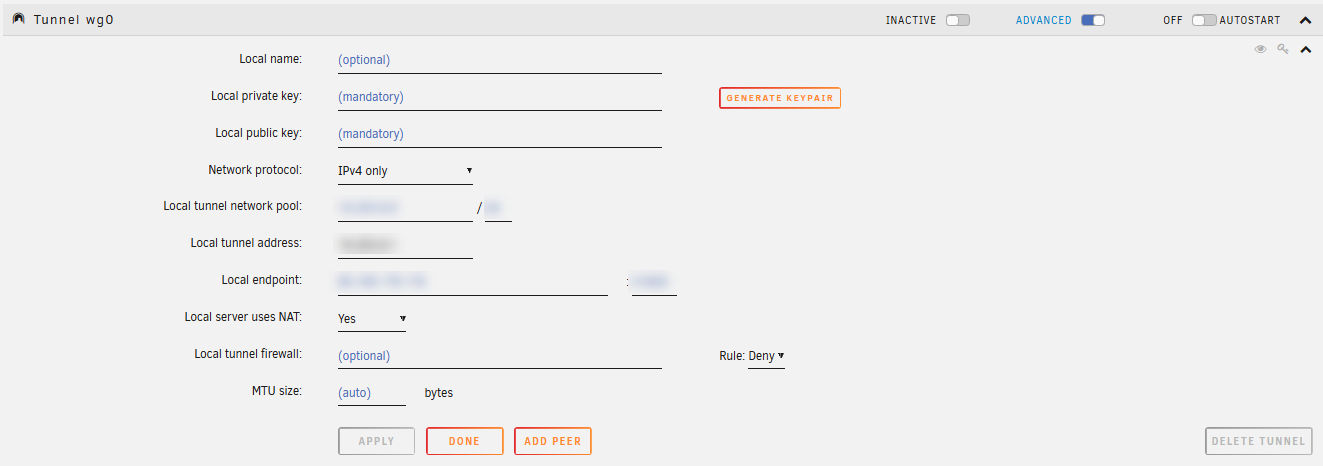
VPN-Manager
Sie können eine VPN-Verbindung zu Ihrem Unraid-Server mithilfe von Wireguard für sichere Internetverbindungen herstellen.
Benutzereinstellungen
Benutzereinstellungen ermöglichen es Ihnen, verschiedene Aspekte Ihrer Interaktionen mit dem Unraid OS zu konfigurieren, einschließlich Benachrichtigungen, Anzeigeeinstellungen, UI-Anpassungen und den Mover-Zeitplan.
Bestätigungen
Sie können von diesem Ort aus die Bestätigungen für verschiedene Aufgaben aktivieren/deaktivieren.

Konsoleneinstellungen
Ermöglicht es Ihnen, die lokale Systemkonsole anzupassen. Sie können das Tastaturlayout auswählen, die Bildschirmleerzeit anpassen und den permanenten Bash-Verlauf über Neustarts hinweg aktivieren oder deaktivieren. Diese Optionen verbessern Ihre Erfahrung, wenn Sie Unraid mit einem angeschlossenen Monitor und einer Tastatur verwenden.

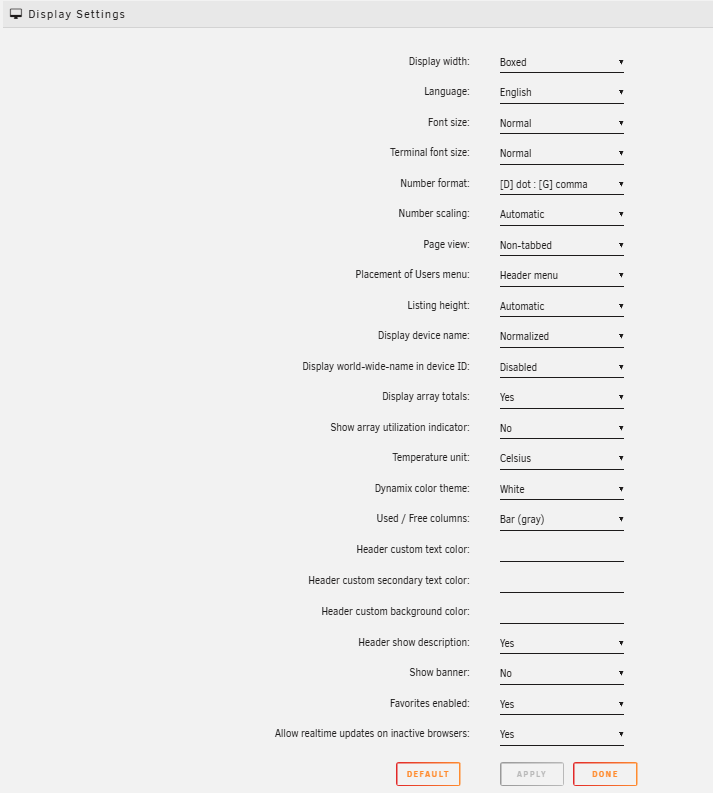
Anzeigeneinstellungen
Passen Sie das Erscheinungsbild des Unraid WebGUI auf dieser Seite an, indem Sie das Datums- und Zeitformat, das Zahlenformat anpassen und zwischen Registerkartensicht und nicht registerkartensicht umschalten. Sie können auch die Temperatureinheit auswählen und aus verschiedenen Themen für die Benutzeroberfläche wählen.
Benachrichtigungseinstellungen
Unraid can send you notifications about important system events, updates, and alerts through your browser, email, or third-party notification services. The Notification Settings page allows you to control how and when you receive these notifications.
To access Notification Settings, navigate to Settings → User Preferences → Notification Settings.

Display and behavior settings
Configure how notifications appear in your browser:
- Notifications display: Choose between Detailed or Summarized notification styles
- Display position: Set where notifications appear (top-right, top-left, bottom-right, bottom-left, or center)
- Auto-close (seconds): How long notifications stay visible before automatically closing
- Date format: Choose your preferred date format for notification timestamps
- Time format: Choose between 12 hours or 24 hours time display
- Store notifications to flash: Save notification history to your USB flash device (requires flash storage space)
Notification types
Control which events trigger notifications:
- System notifications: General system events and messages
- Unraid OS update notification: Alerts when new Unraid OS versions are available
- Plugins update notification: Alerts when plugin updates are available
- Docker update notification: Alerts when Docker container updates are available
- Language update notification: Alerts when language pack updates are available
- Array status notification: Alerts about array events and status changes
For each notification type, you're able to set the frequency to Never check, or checking daily, weekly, monthly, or, in some cases, even multiple times a day.
Delivery methods
Choose how you want to receive notifications for each category (Notices, Warnings, and Alerts):
- Browser: Display notifications in the WebGUI when you're logged in
- Email: Send notifications via email (requires SMTP configuration)
- Agents: Send notifications through configured third-party services
Enable Browser notifications for immediate visibility when using the WebGUI, and Email for alerts when you're away from your server. Use Agents to integrate with mobile apps and services like Discord or Telegram.
SMTP Settings
To receive email notifications, you need to configure your email server settings. Unraid supports many email providers including Gmail, Outlook, and custom SMTP servers.
The SMTP Settings can be found at Settings → User Preferences → Notification Settings → SMTP Settings.
Basic configuration:
- Preset service: Select a preset configuration (Gmail, Outlook/Hotmail, or Custom) to auto-fill common settings
- Sending email address: The email address notifications will be sent from
- Email recipients: Comma-separated list of email addresses to receive notifications
- Priority in header: Mark emails as high priority (Yes or No)
- Email subject prefix: Text to prepend to all notification email subjects (default: Unraid Status:)
Server settings:
- Mail server: SMTP server address (e.g.,
smtp.gmail.com) - Mail server port: SMTP port number (common ports:
465for SSL/TLS,587for STARTTLS,25for unencrypted) - Use SSL/TLS: Enable SSL/TLS encryption (Yes or No)
- Use STARTTLS: Use STARTTLS for encryption (Yes or No)
- Define a TLS certificate: Specify a custom TLS certificate if needed (Yes or No)
- TLS certificate location: Path to custom certificate file (only if Define a TLS certificate is enabled)
Authentifizierung:
- Authentication method: Choose None, CRAM-MD5, or Login (username/password)
- Username: Your email account username (usually your full email address)
- Password: Your email account password or app-specific password
After configuring your settings, use the TEST button to verify your email configuration is working correctly.
Configuring Gmail with app passwords
Gmail requires app-specific passwords when using SMTP with accounts that have 2-step verification enabled (which is recommended for security).
To set up Gmail notifications:
- In Preset service, select Gmail (this will auto-fill the Mail server and Mail server port)
- Enter your Gmail address in Sending email address
- Enter recipient email address(es) in Email recipients
- Set Username to your full Gmail address (e.g.,
yourname@gmail.com) - For Password, you'll need to generate an app password:
- Go to your Google Account settings
- Navigate to Security
- Under "How you sign in to Google," ensure 2-Step Verification is enabled (required for app passwords)
- In the same section, find and click App passwords (or search for "App passwords" in the search bar)
- You may need to verify your identity
- Enter a custom name for the App name, like "Unraid Server".
- Klicken Sie auf Erstellen
- Google will generate a 16-character password.
- Copy this password and paste it into the Password field in Unraid
- Click TEST to verify the configuration
- Click DONE to save your settings
- Mail server:
smtp.gmail.com - Mail server port:
465 - Use SSL/TLS:
Yes - Use STARTTLS:
No - Authentication method:
Login
Always use app passwords instead of your main Gmail password. App passwords can be revoked individually without changing your main account password, providing better security if your Unraid configuration is ever compromised.
Benachrichtigungsagenten
Notification agents allow you to send alerts to third-party services and mobile apps. Unraid includes built-in support for many popular notification services.
To access Notification Agents, click the Notification Agents link on the Notification Settings page, or navigate to Settings → User Preferences → Notification Settings → Notification Agents.
Built-in agents include:
 Bark: iOS notification app
 Boxcar: Push notification service
 Discord: Send notifications to Discord channels via webhook
 Gotify: Self-hosted notification server
 ntfy.sh: Simple HTTP-based notification service
 Prowl: iOS push notifications
 Pushbits: Self-hosted notification relay
 Pushbullet: Cross-platform notification service
 Pushover: Push notification service for iOS and Android
 Pushplus: Chinese push notification service
 ServerChan: Chinese server monitoring and notification service
 Slack: Send notifications to Slack channels via webhook
 Telegram: Send messages to Telegram bot
Configuring an agent:
- Select the agent you want to configure from the list
- Change Agent function from Disabled to Enabled
- Fill in the required fields for that service:
- Most agents require a webhook URL, API token, or access token
- Some services require additional configuration like channel IDs or group codes
- Configure Notification title (usually set to Subject to use the notification subject)
- Configure Notification message (usually set to Description to use the full notification text)
- Click DONE to save
Each agent has different requirements - consult the documentation for your chosen service to obtain the necessary API keys, webhook URLs, or tokens.
You can enable multiple agents simultaneously. For example, you might use Discord for team notifications and Pushover for personal mobile alerts. Note that all notifications are sent to all enabled agents, so using multiple agents may result in receiving duplicate notifications.
Scheduler
The Scheduler settings page allows you to easily configure the frequency for automated tasks including parity checks, the cache Mover, and TRIM/Discard operations for SSDs.
Benutzerprogramme
Hier werden Drittanbieter-Plugins angezeigt, die die Funktionalität von Unraid erweitern und Ihnen mehr Kontrolle über Ihren Server geben. Zum Beispiel ist das Community-Applikationen Plugin enthalten. Andere Plugins bieten Funktionen zur Systemüberwachung, -wartung, Speicherverwaltung und appdata-Backups.
* "WireGuard" und das "WireGuard" Logo sind eingetragene Marken von Jason A. Donenfeld.